A detailed & vibrant Listing increases your visibility & gives you the best chance of sealing that Deal.
You don’t have to be as cool as Einstein just follow the Guidelines & step by step process below. Contact Us if you need help !

Kindly follow these Listing Guidelines
1. No more than 5 photos :
To keep GEARhub website working optimally you are allowed to put up no more than 5 images per listing, ( if someone is interested they can always contact you directly for more photos or even a video too ).
2. IMAGES ON GEARhub :
All Product images on GEARhub must be resized to 800x800px size.
Use this > Simple Image Resizer
All images on GEARhub must also be coverted to either a PNG or WEBP Format.
Use this Simple Image Converter
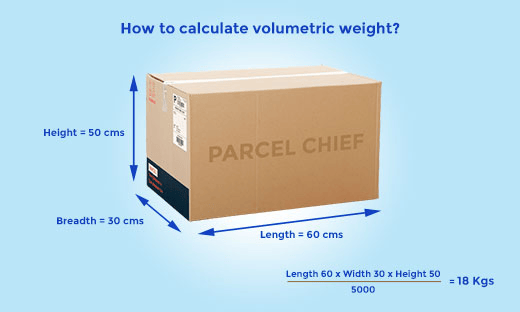
3. Add Product Weight & Dimensions :
To make it easier for buyers to calculate Courier & Shipping costs please
add Weight & Dimensions to your listing.
Pro Tip > Get your images ready before you upload your Gear.
Follow these two Video’s on how to Resize & Convert your images for GEARhub.
Resizing your Images :
All Product images on GEARhub must be resized to 800x800px size.
Use this > Simple Image Resizer
Need Help ? Simply follow this video below
Converting your Images :
All images on GEARhub must be converted to either a PNG or WEBP Format.
Use this > Simple Image Converter
Need Help ? Simply follow this video below
Additional Tips :
> TAKE HIGH QUALITY PHOTOS : Show the item’s condition in its best light, highlighting any cosmetic imperfections.
Take note that it’s also important to name your individual product photos before uploading to GEARhub. Correctly named images make it easy for buyers to find your Listing & increase your chances of making that sale. Eg: If it is a Fender stratocaster Blackie then name your image > Fender stratocaster blackie.
> BRANDS : Please enter the Brand name of your gear – eg: Fender, Roland, Yamaha etc, (this will make it easy for buyers to find your listing by their preferred brand).
> TAGS : GEARhub tags are to be used to describe the condition of musical instruments and equipment. They help buyers understand the item’s quality and wear and tear before purchasing. GEARhub uses these condition tags to help sellers and buyers communicate effectively.
* Here’s a breakdown of GEARhub condition tags:
– Brand new condition : “Brand new” refers to an item that is in its original, pristine condition, as it was when it was manufactured. It is unused, unopened, and undamaged, typically still in its original packaging. Essentially, it’s the highest possible condition for an item before it’s ever been used.
– Mint condition : As it arrived from the factory. No scratches, No wear, mint.
– Excellent condition : “As new, no wear and tear, or only slight wear and tear.”
– Very Good condition : “More cosmetic imperfections than ‘Excellent’, but still in great condition overall.”
– Good condition : “Item shows wear and tear, but has nothing that would affect its playability or function.”
– Fair condition : “Item has a significant amount of wear and tear, but still functional. May need minor repairs.”
– For Parts : “Item has significant damage and is likely not playable or functional. Best suited for parts or repair.
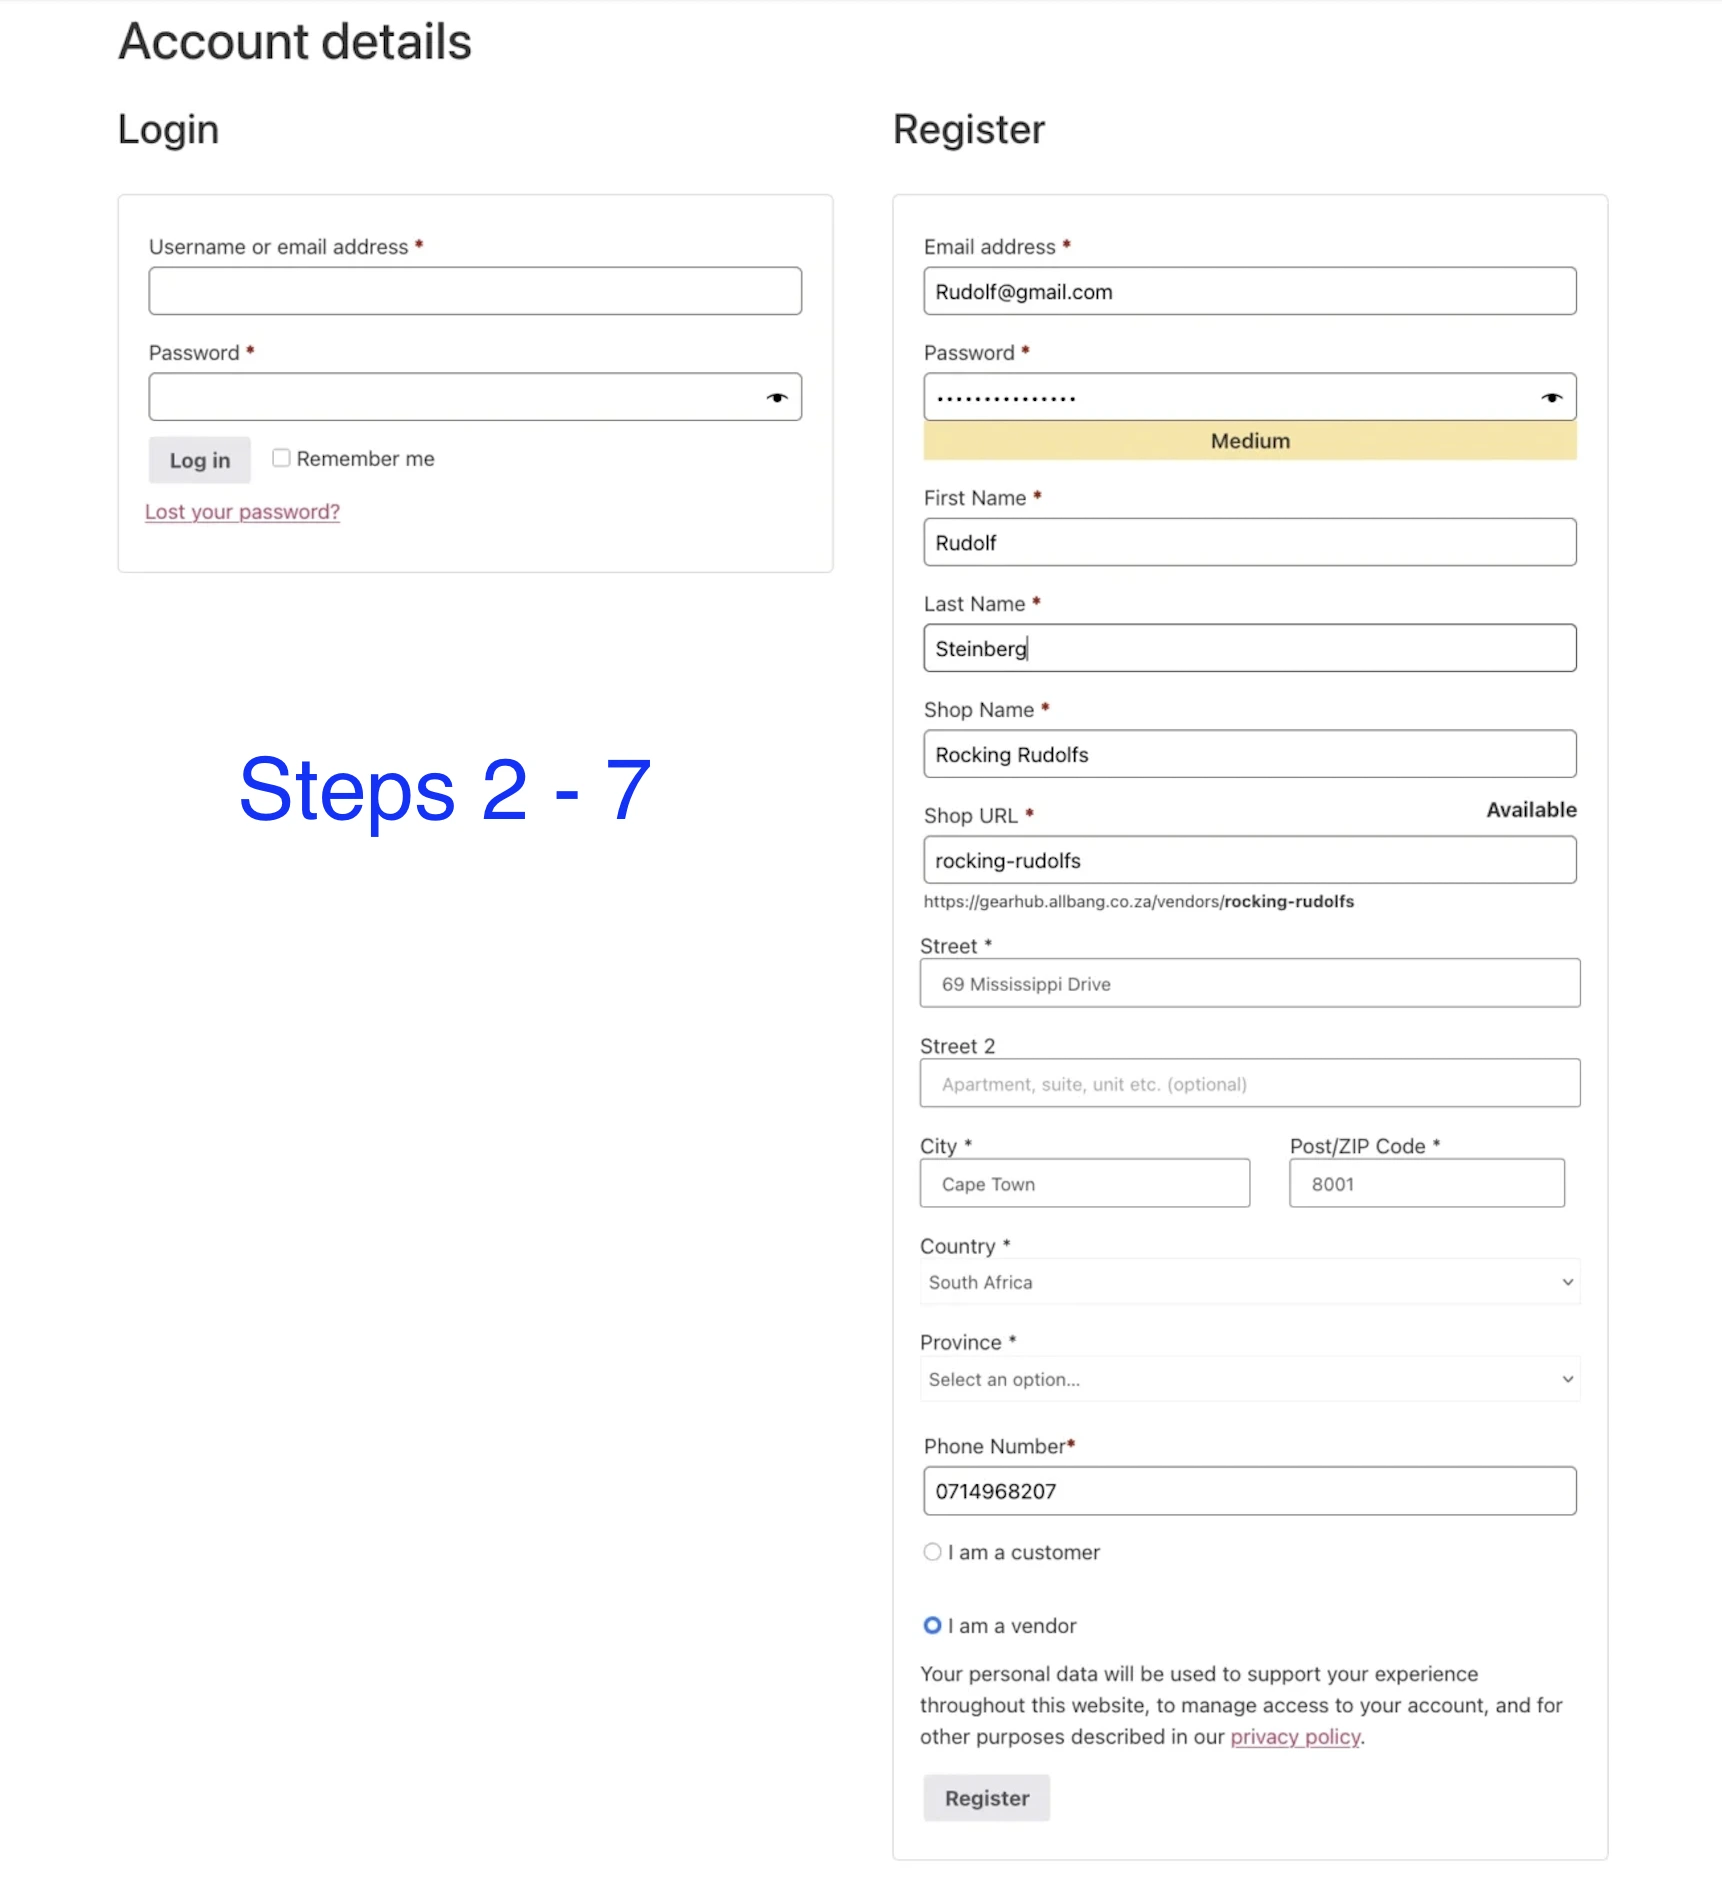
STEP 1 > REGISTER & SETUP YOUR ACCOUNT
- On GEARhub main menu click > TRADERS HUB, in the drop down menu click > Your Account.
- Start Registering by entering your email address & GEARhub Password.
- Fill in your First & Last Name.
- Choose &/or Enter your Shop Name. ( Your Shop URL will be automatically inserted ).
- Enter your full Address & Phone Number.
- Select I am a vendor
- Click Register.
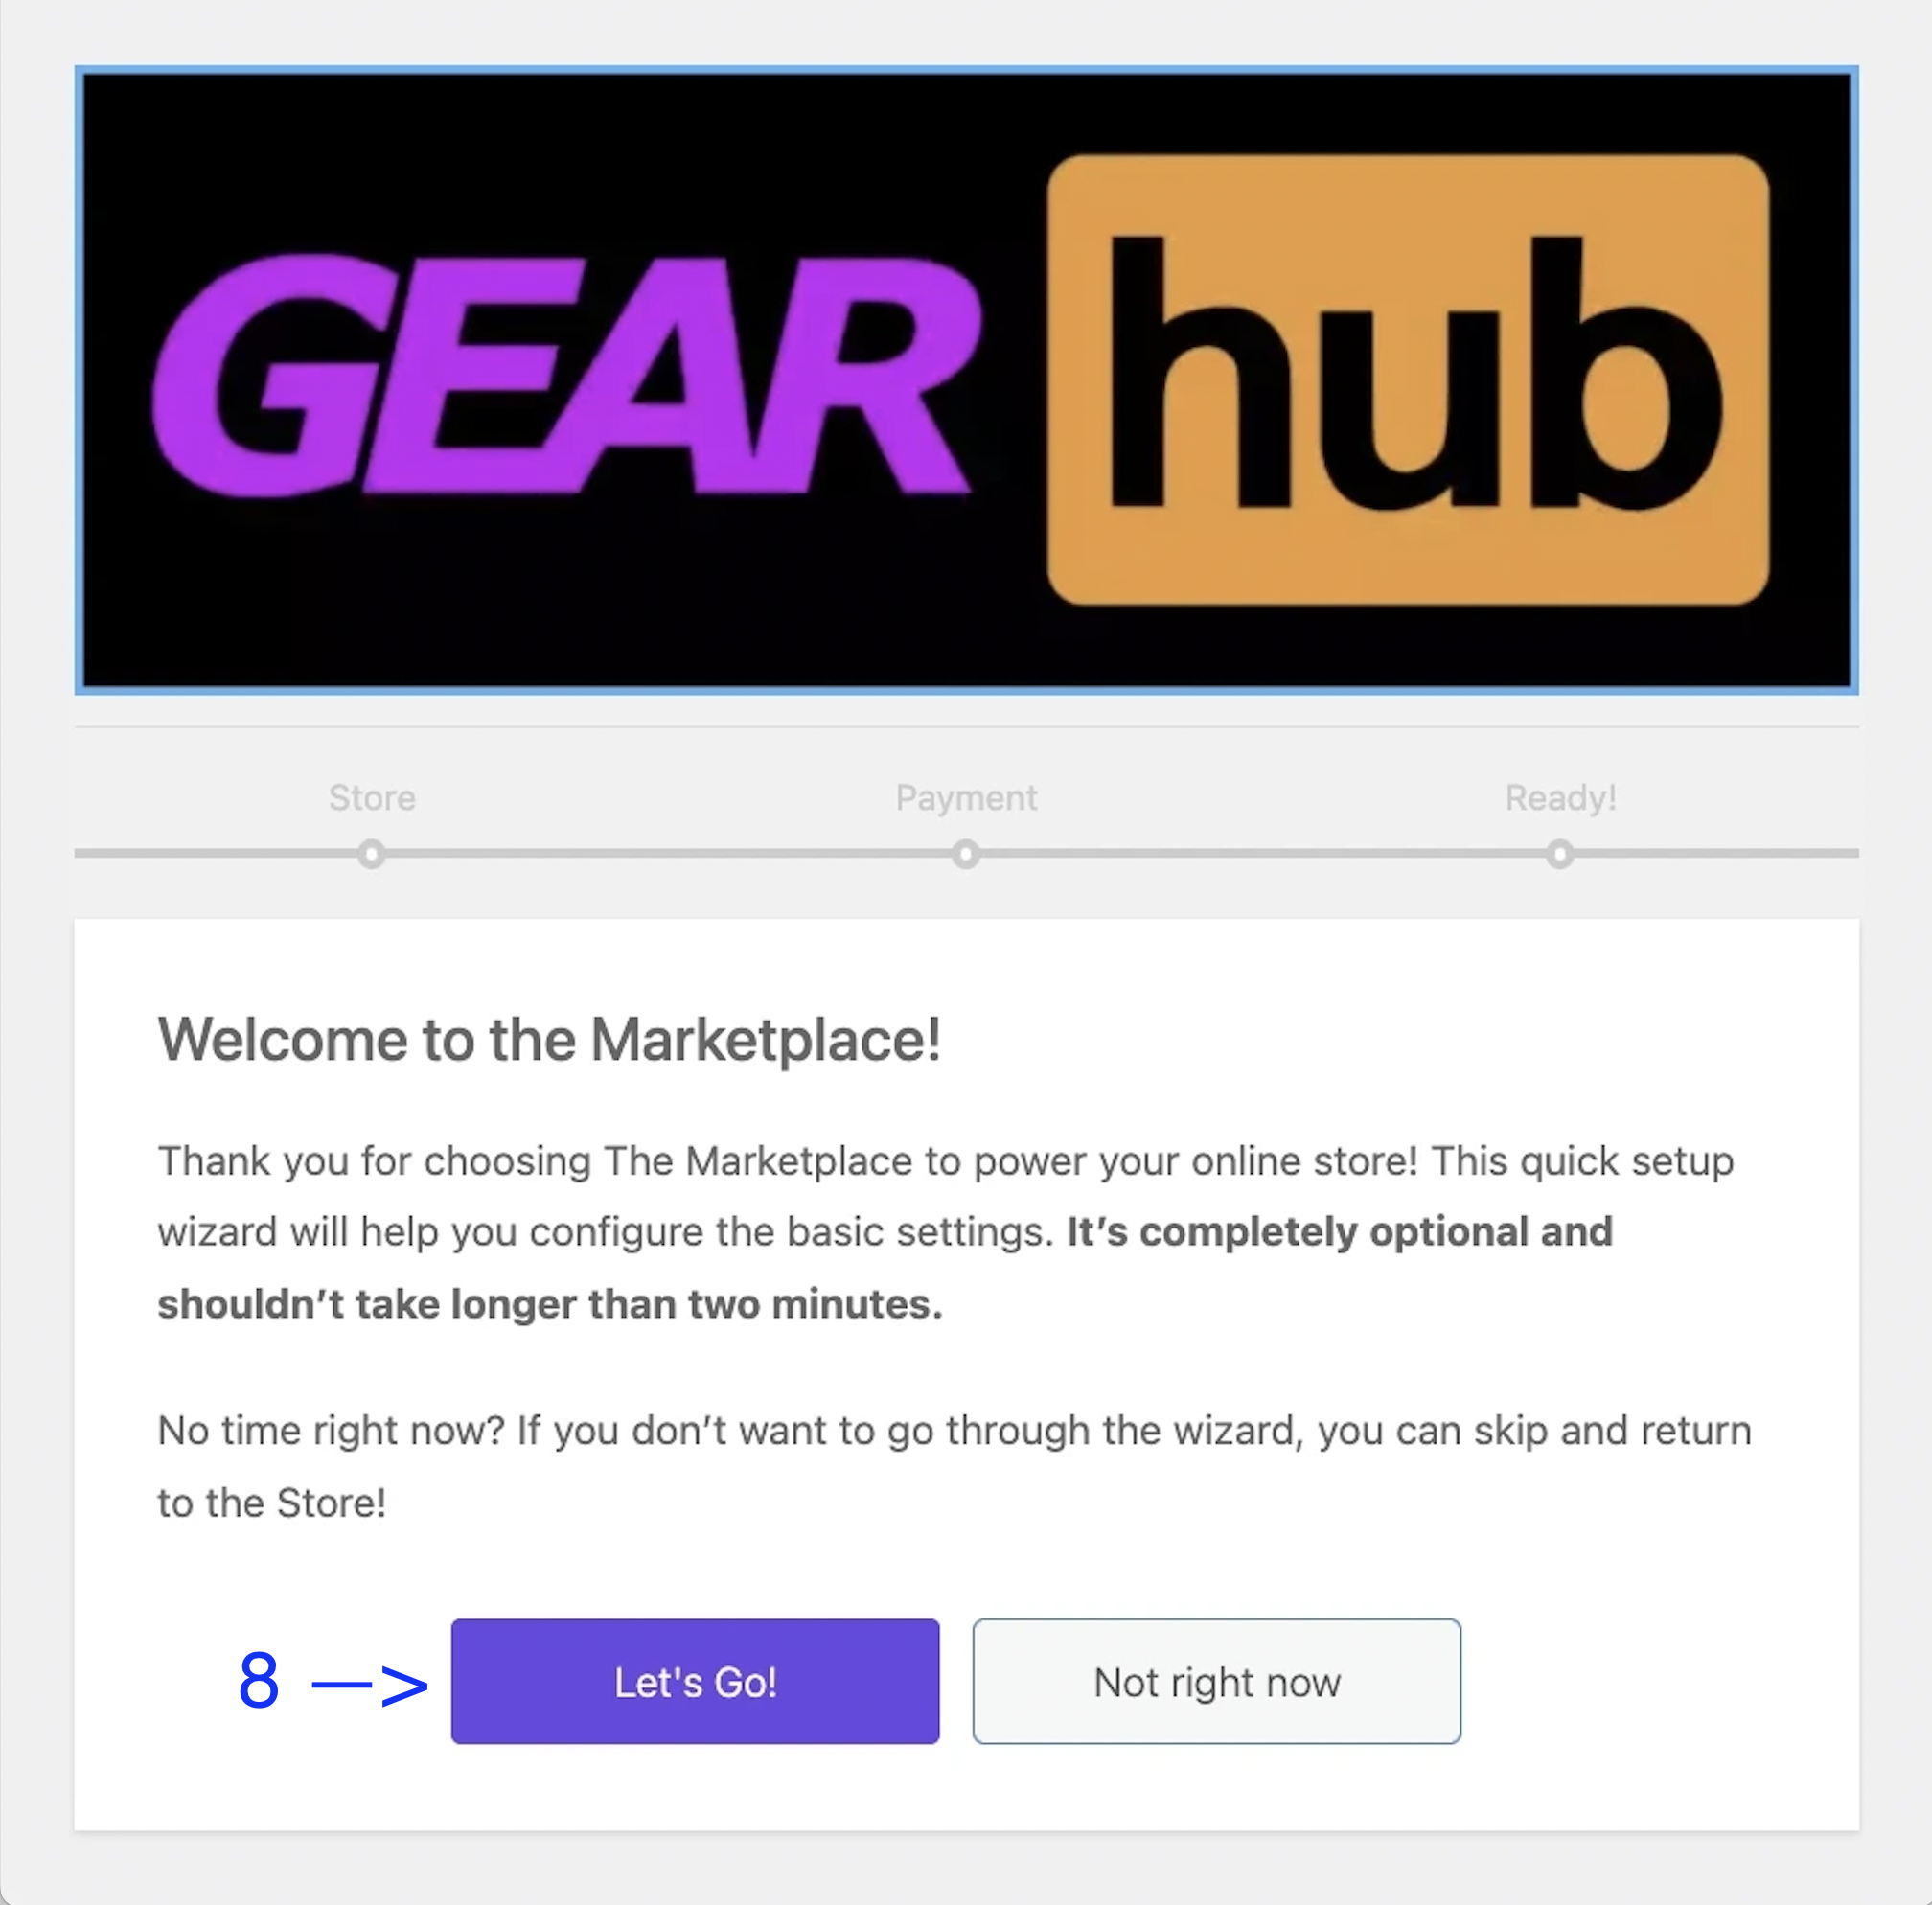
- Welcome to the Marketplace! Click > Let’s Go!
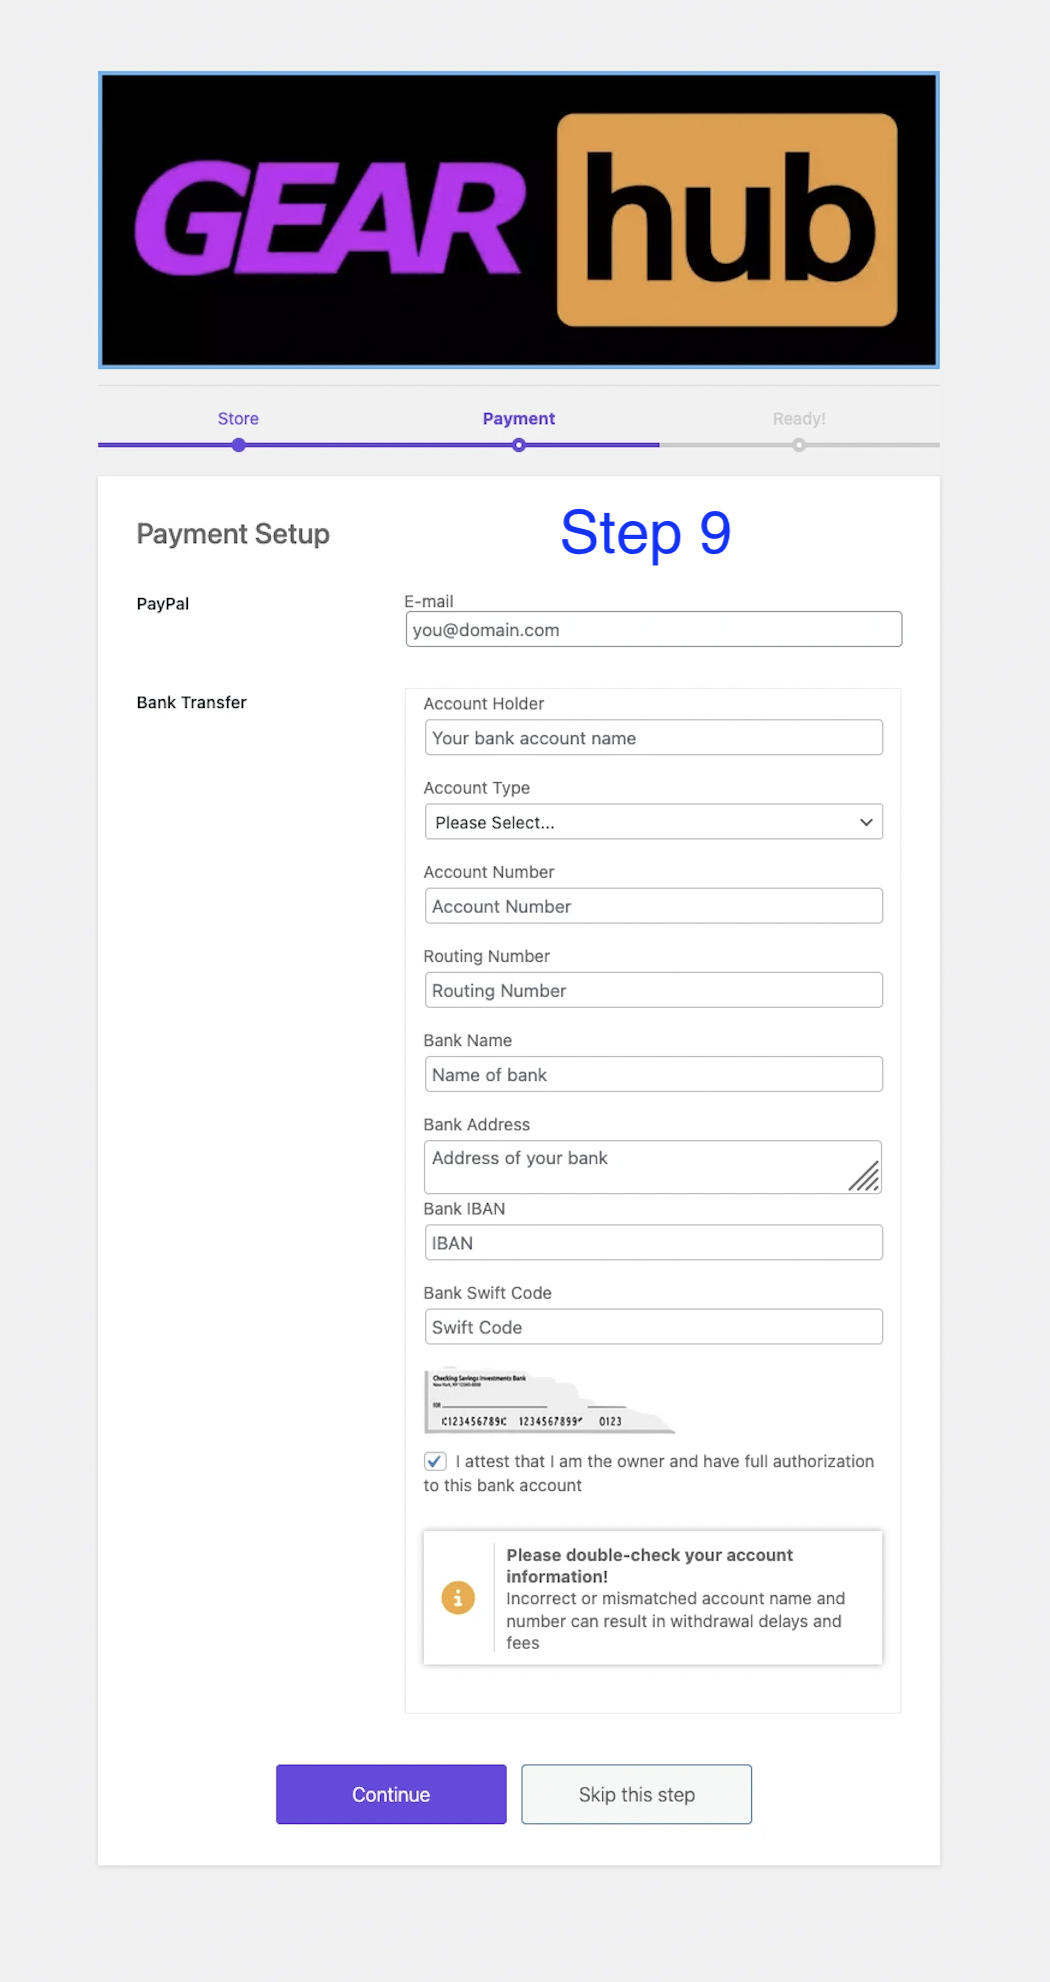
- Payment Setup – Enter your Banking Details for GEARhub transactions. Then click > Continue.
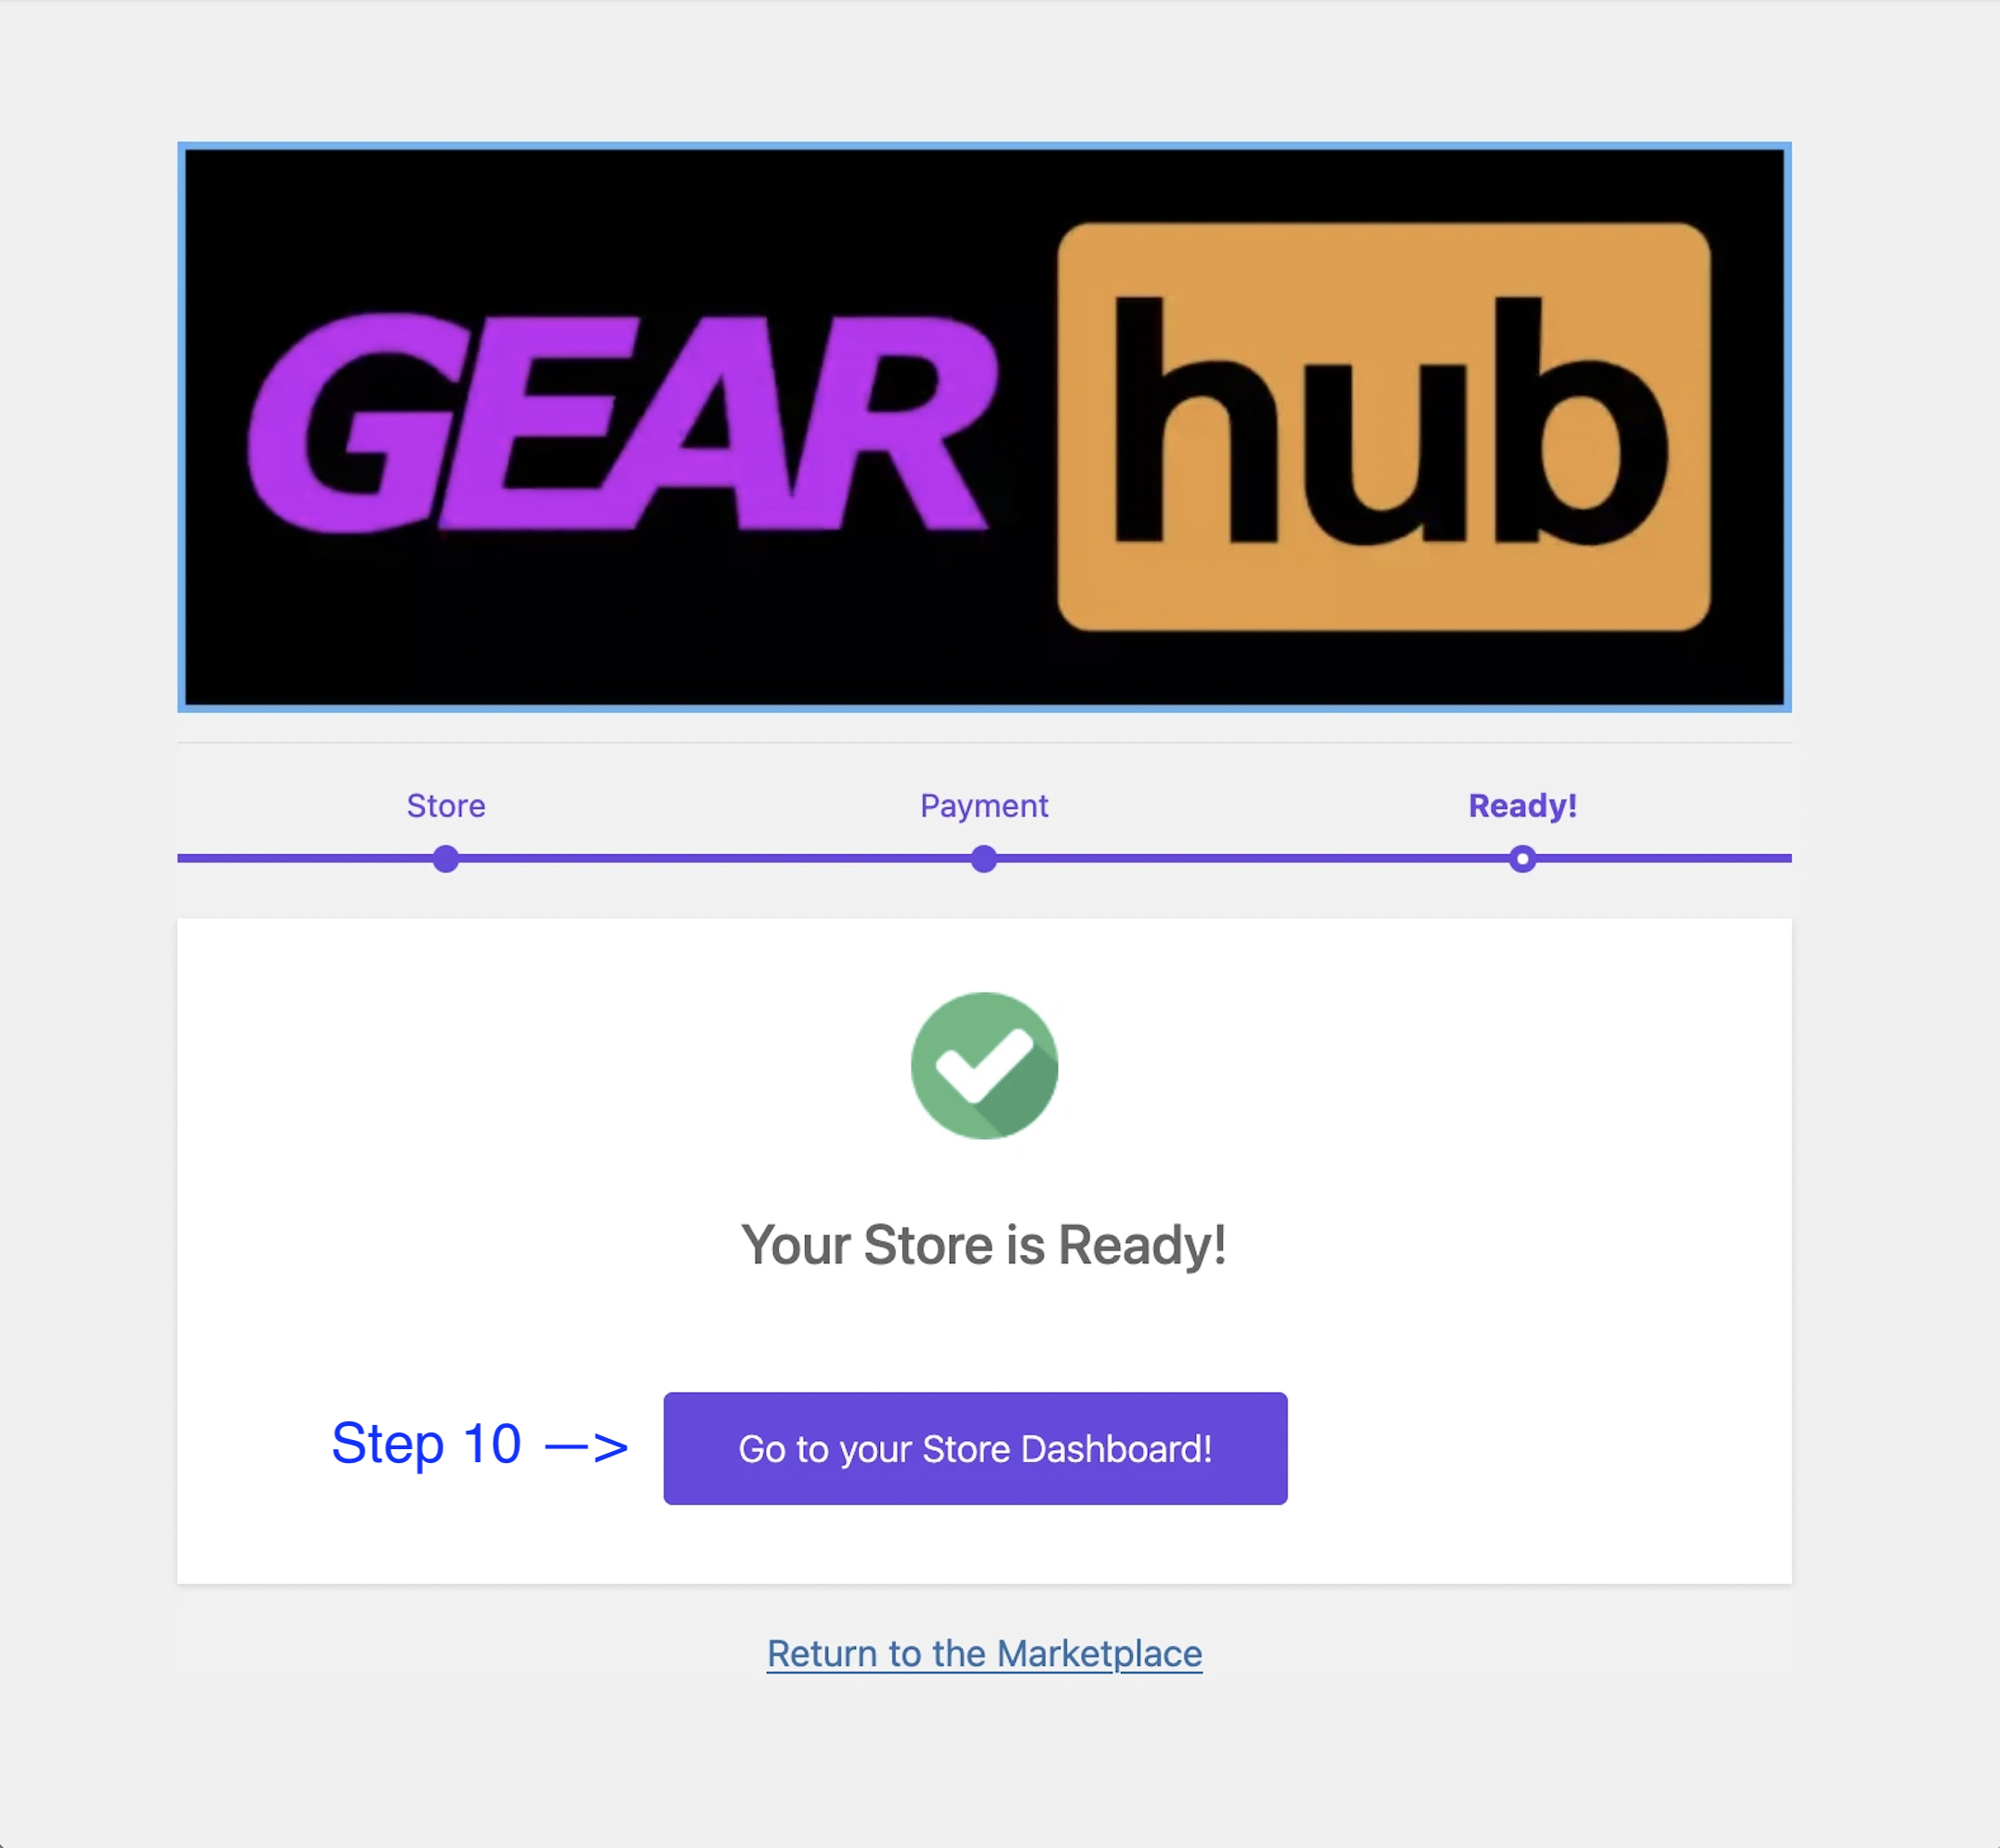
- Your Store is Ready! click > Go to your Store Dashboard!

STEP 2 > SETUP YOUR STORE
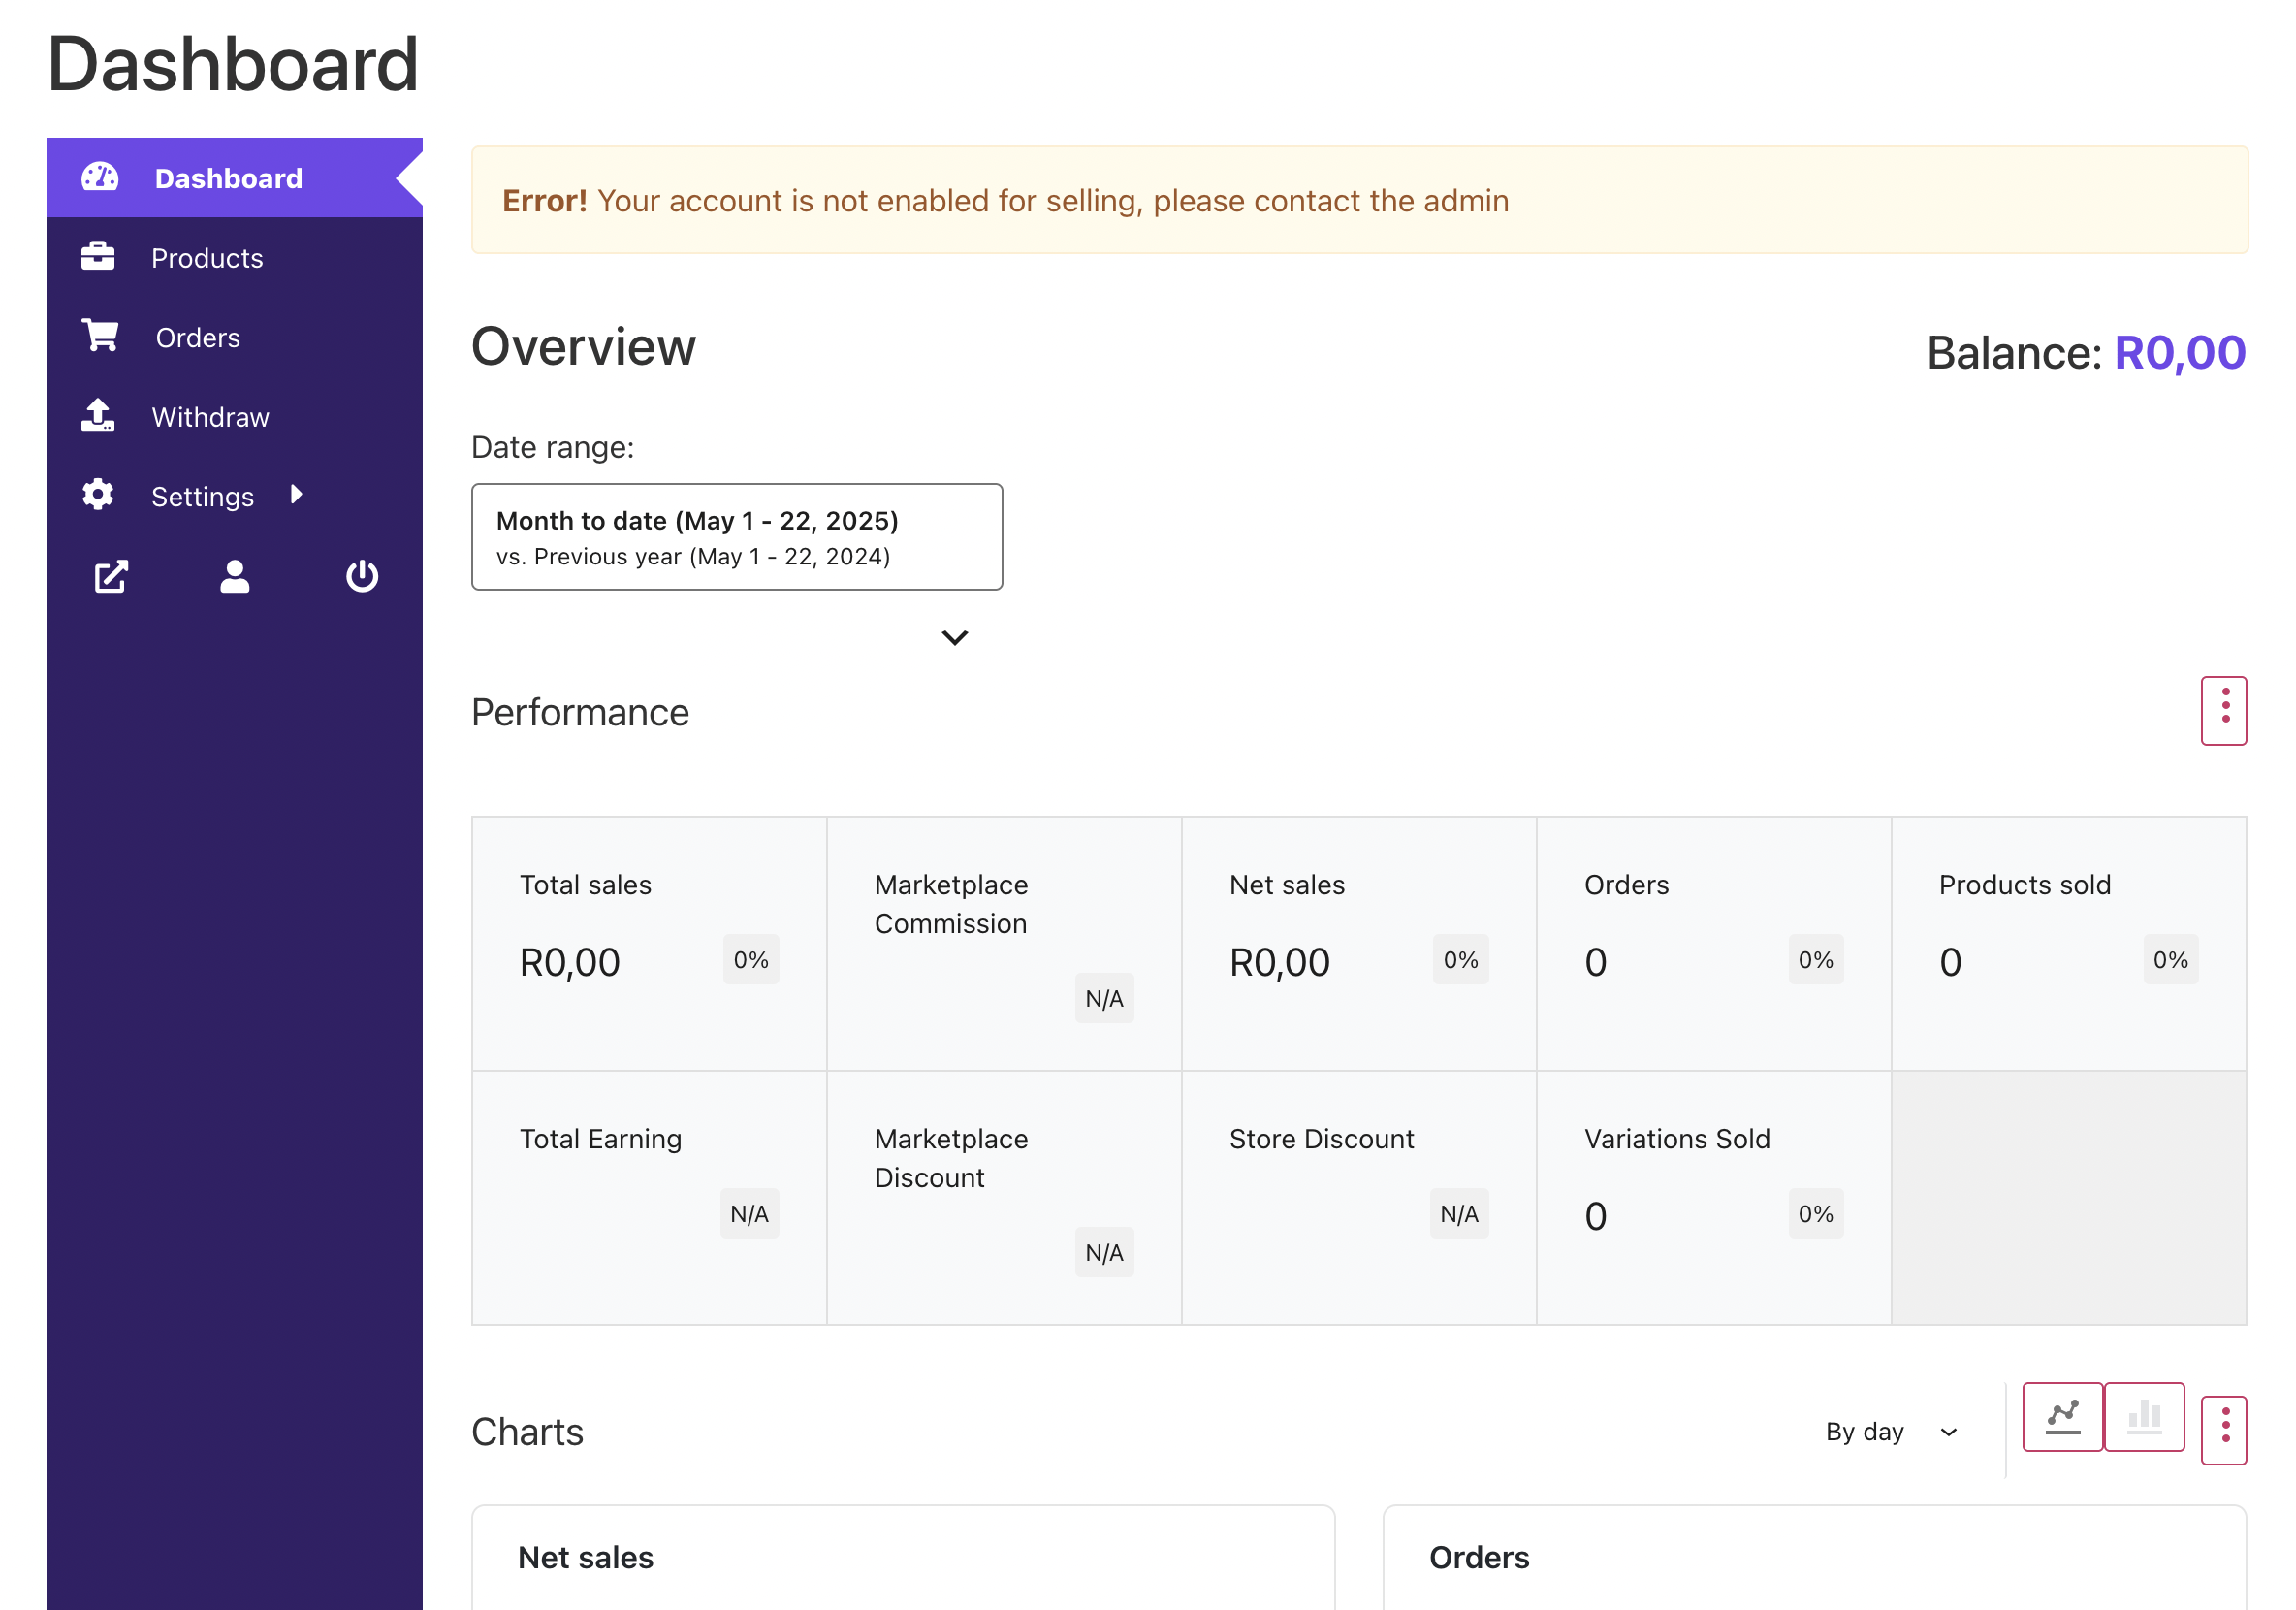
Welcome to DASHBOARD
GEARhub Dashboard gives you an overall summary of your stores activities.
From here you can easily setup & manage your store, list your Products
as well as track your Orders & Payments.
If you have not as yet been approved as a TRADER please get a copy of your I.D ready & send it to info@allbang.co.za
* Once you have been verified by GEARhub the Error message! Your account is not enabled for selling – Will disappear.
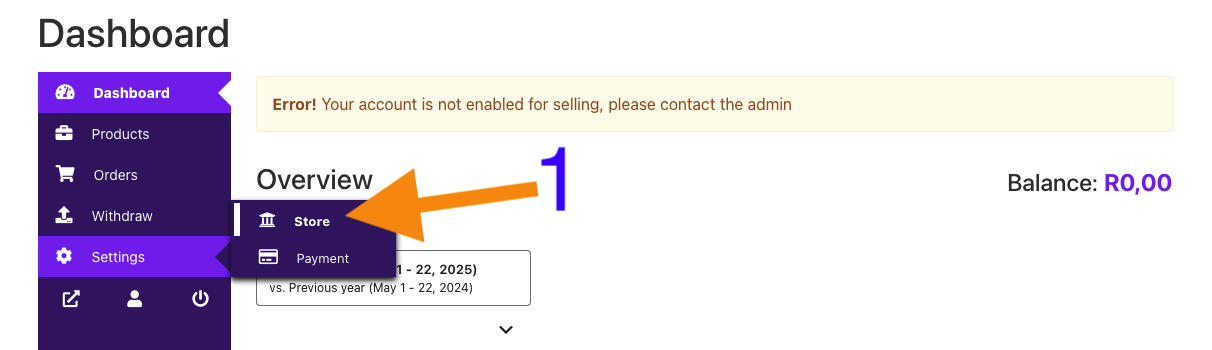
- Let’s setup your Store by clicking > Settings on Dashboard Menu, & selecting > Store from the drop down menu.
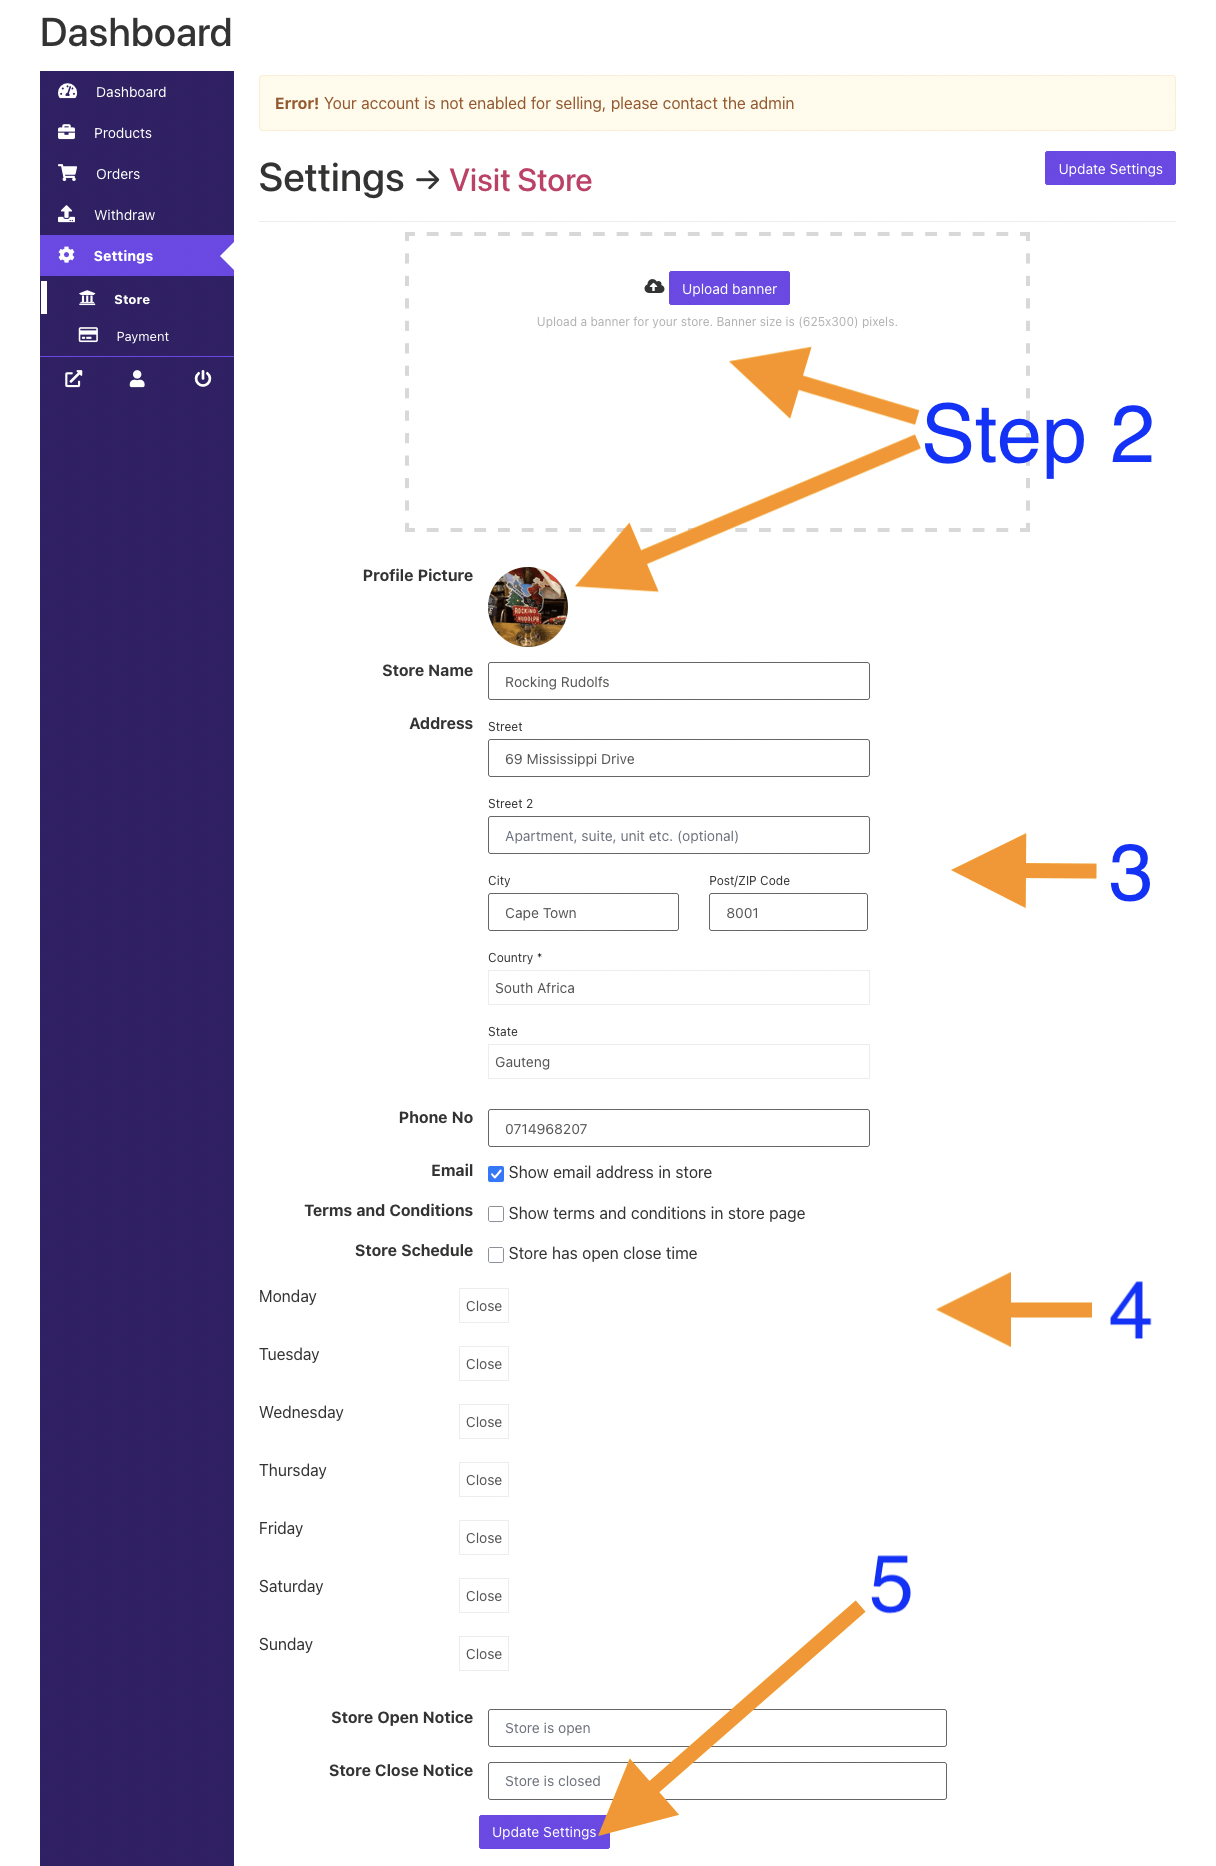
- Start by uploading your Store Banner & Profile photo. * Remember All images on GEARhub must be uploaded in either a PNG or WEBP Format. Use this > Simple Image Converter * Store Profile size is (150×150) pixels & Banner size is (625×300) pixels. Click on this link to > Resize your images. If you need help then simply click here > LISTING GUIDELINES. There are two videos to follow & guide you through Resizing & Converting your images for GEARhub.
- Confirm your Store Name, Address & Phone Number.
- If applicable choose & tick whether you would like your Email address visible, as well as your Terms & Conditions, & your Stores Open & Closed times.
- Click on UPDATE SETTINGS at the bottom of the page.
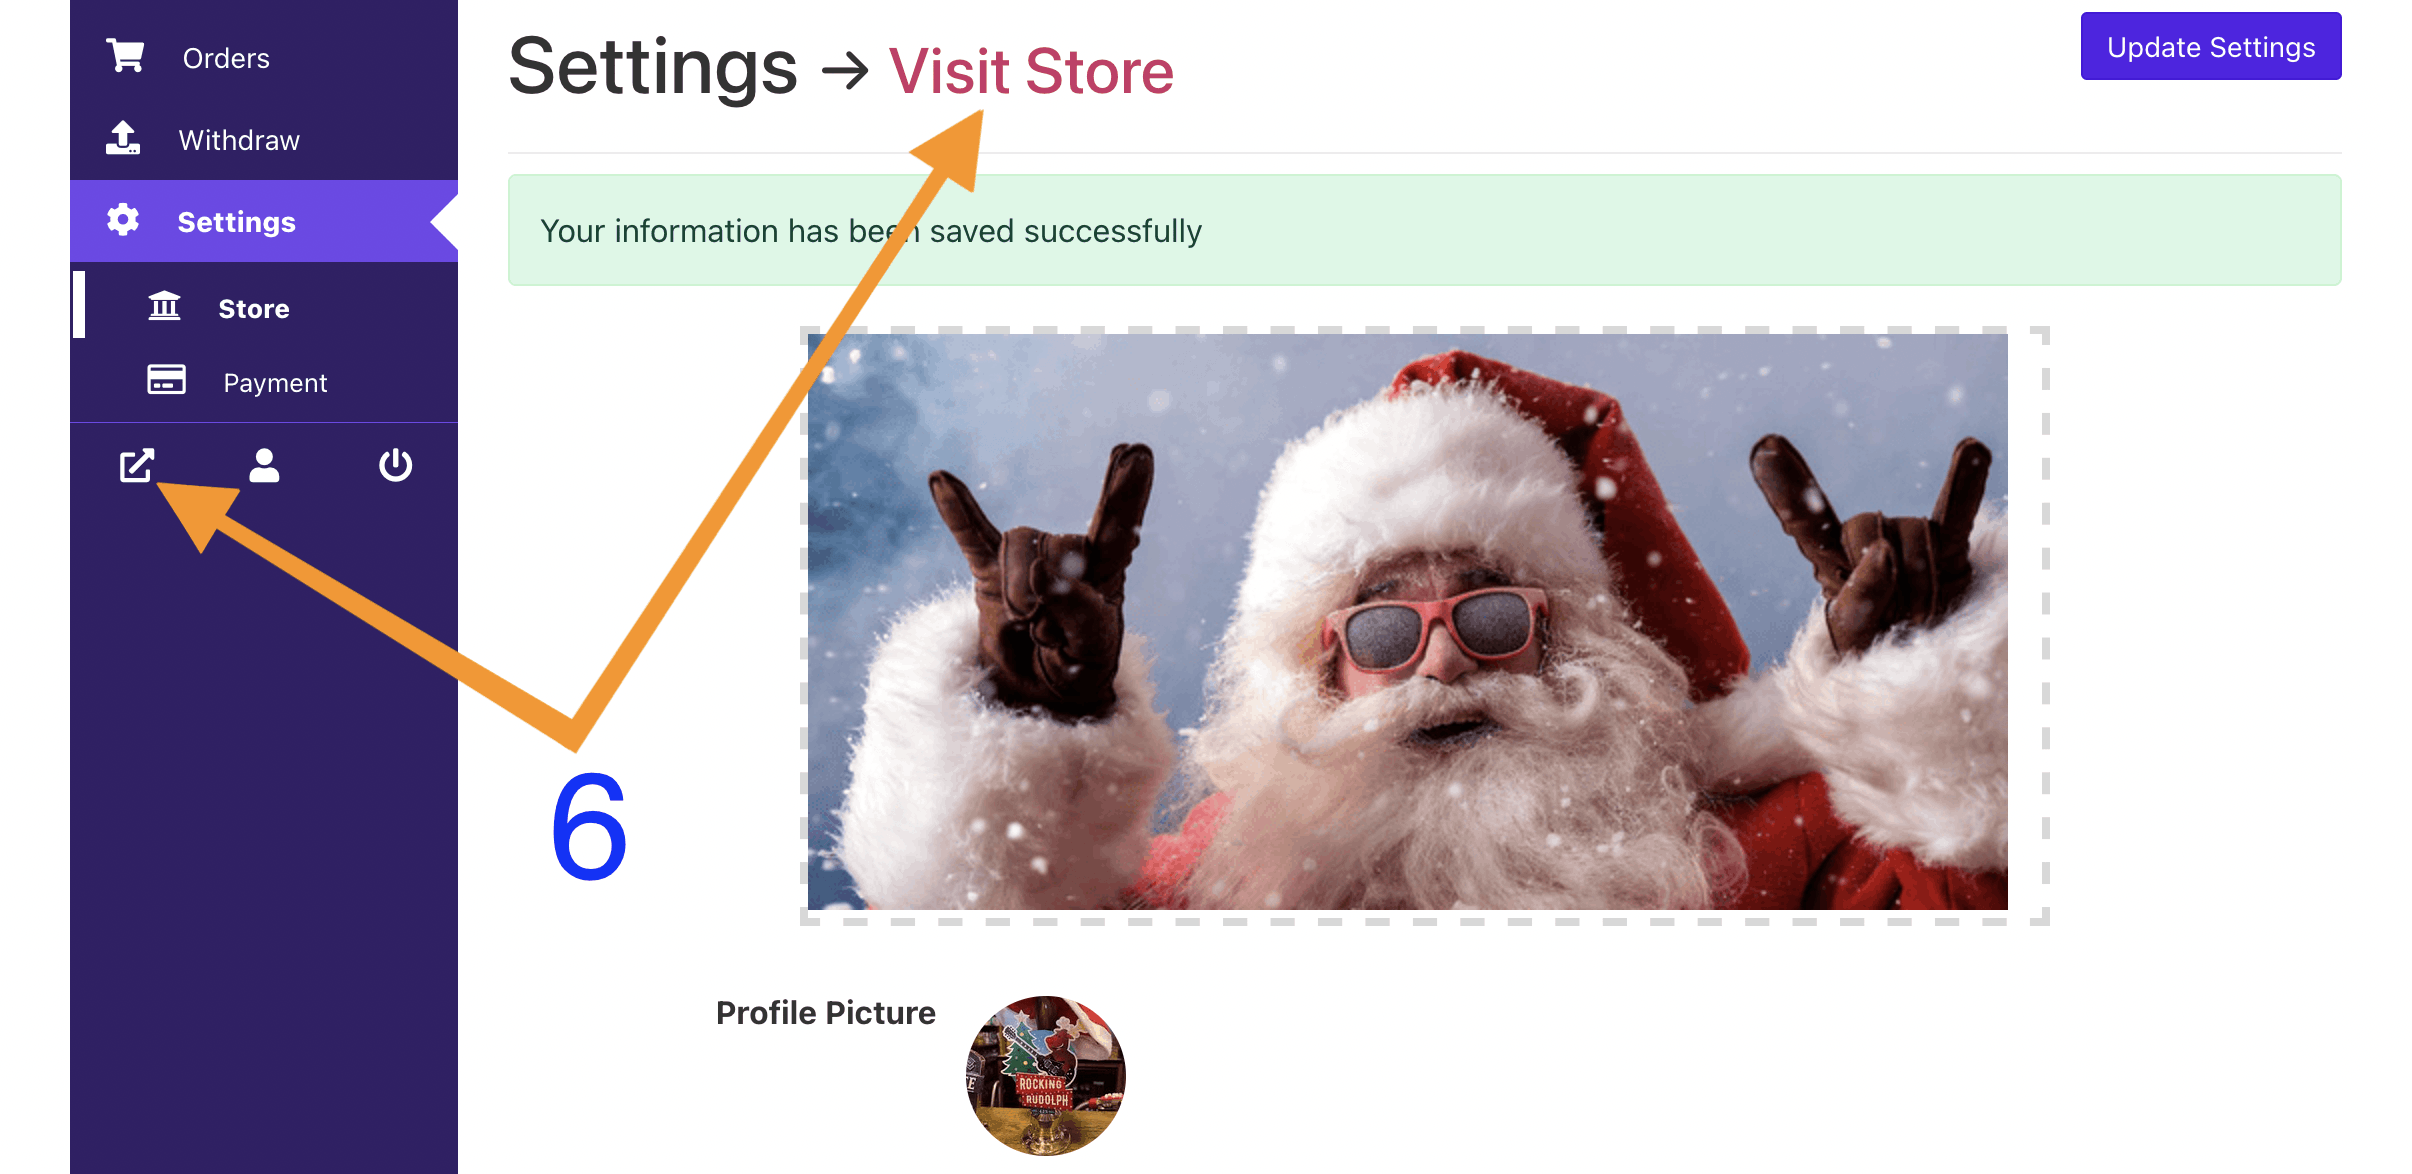
- Congrats you are ready to start listing your Products ! Take a look at your store by clicking on the VISIT STORE icon on your Dashboard.
STEP 3 > HOW TO LIST YOUR PRODUCTS
It’s time to upload your Gear so
get yourself a cuppa & let’s do this !
Kindly follow these Listing Guidelines
1. No more than 5 photos :
To keep GEARhub website working optimally you are allowed to put up no more than 5 images per listing, ( if someone is interested they can always contact you directly for more photos or even a video too ).
2. IMAGES ON GEARhub :
All Product images on GEARhub must be resized to 800x800px size.
Use this > Simple Image Resizer
All images on GEARhub must also be coverted to either a PNG or WEBP Format.
Use this Simple Image Converter
3. Add Product Weight & Dimensions :
To make it easier for buyers to calculate Courier & Shipping costs please
add Weight & Dimensions to your listing.
Pro Tip > Get your images ready before you upload your Gear.
Follow these two Video’s on how to Resize & Convert your images for GEARhub.
Resizing your Images :
All Product images on GEARhub must be resized to 800x800px size.
Use this > Simple Image Resizer
Need Help ? Simply follow this video below
Converting your Images :
All images on GEARhub must be converted to either a PNG or WEBP Format.
Use this > Simple Image Converter
Need Help ? Simply follow this video below
Additional Tips :
> TAKE HIGH QUALITY PHOTOS : Show the item’s condition in its best light, highlighting any cosmetic imperfections.
Take note that it’s also important to name your individual product photos before uploading to GEARhub. Correctly named images make it easy for buyers to find your Listing & increase your chances of making that sale. Eg: If it is a Fender stratocaster Blackie then name your image > Fender stratocaster blackie.
> BRANDS : Please enter the Brand name of your gear – eg: Fender, Roland, Yamaha etc, (this will make it easy for buyers to find your listing by their preferred brand).
> TAGS : GEARhub tags are to be used to describe the condition of musical instruments and equipment. They help buyers understand the item’s quality and wear and tear before purchasing. GEARhub uses these condition tags to help sellers and buyers communicate effectively.
* Here’s a breakdown of GEARhub condition tags:
– Brand new condition : “Brand new” refers to an item that is in its original, pristine condition, as it was when it was manufactured. It is unused, unopened, and undamaged, typically still in its original packaging. Essentially, it’s the highest possible condition for an item before it’s ever been used.
– Mint condition : As it arrived from the factory. No scratches, No wear, mint.
– Excellent condition : “As new, no wear and tear, or only slight wear and tear.”
– Very Good condition : “More cosmetic imperfections than ‘Excellent’, but still in great condition overall.”
– Good condition : “Item shows wear and tear, but has nothing that would affect its playability or function.”
– Fair condition : “Item has a significant amount of wear and tear, but still functional. May need minor repairs.”
– For Parts : “Item has significant damage and is likely not playable or functional. Best suited for parts or repair.
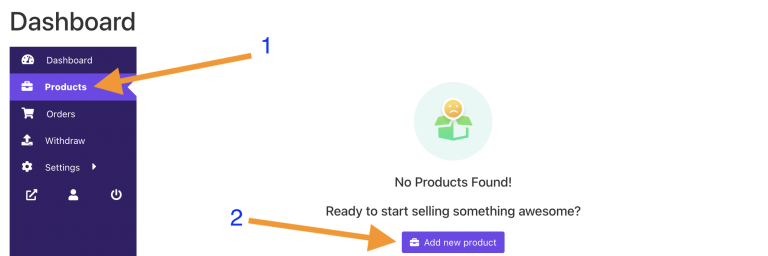
1. Click > PRODUCTS on your GEARhub Dashboard menu.
2. Click on the Add New Product button.
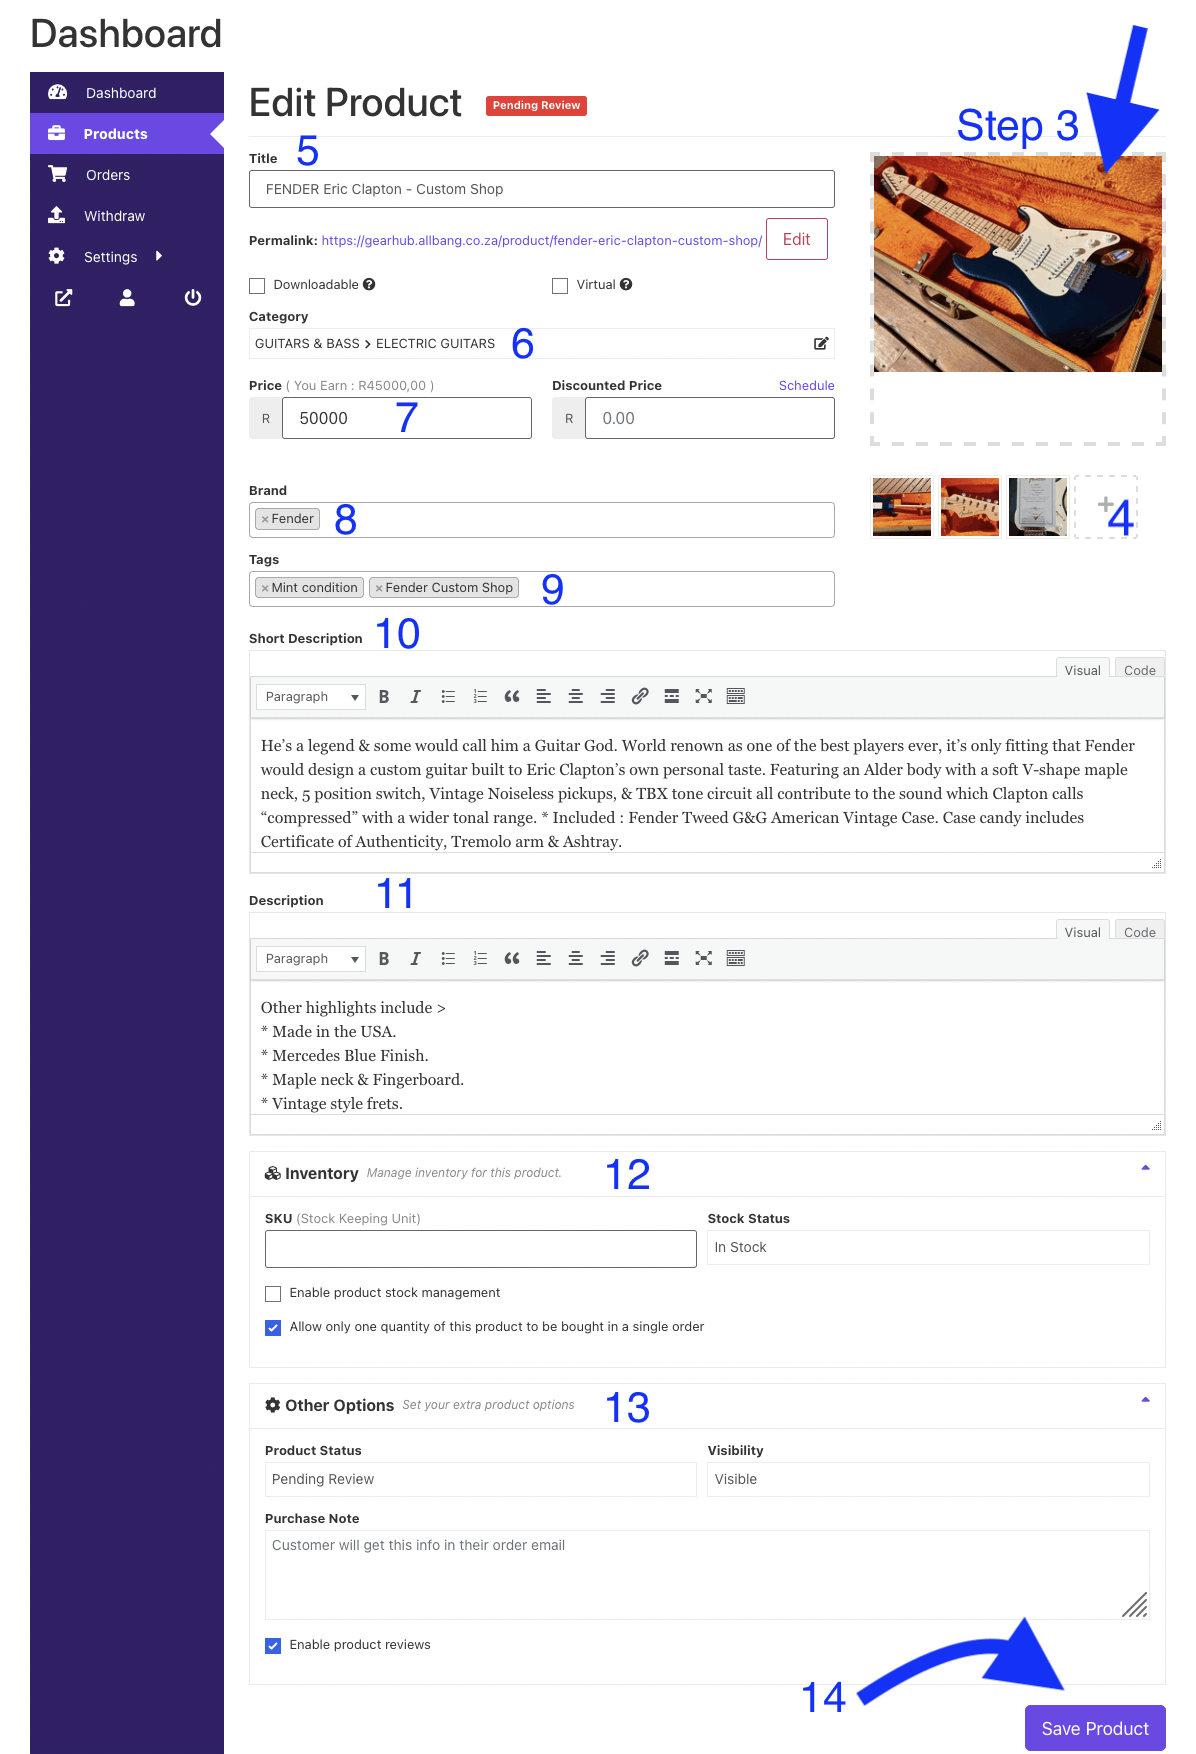
3. It’s time to upload your juicy main/featured image, click > Upload a product cover image : in the pop-up window select or drag your already resized & converted PNG or WEBP image.
4. Add gallery image : Click on the “+” box to add up to 4 more images if necessary.
5. Start by filling in the Title eg: FENDER Eric Clapton – Custom Shop.
6. Select a suitable Category for your listing : eg for a Fender Stratocaster it would fall under GUITARS & BASS > ELECTRIC GUITARS.
7. Price : Enter your Selling Price.
8. Brand : Please enter the Brand name of your gear – eg: Fender, Roland, Yamaha etc, (this will make it easy for buyers to find your listing by their preferred brand).
9. Tags : GEARhub tags are to be used to describe the condition of musical instruments and equipment. They help buyers understand the item’s quality and wear and tear before purchasing. GEARhub uses these condition tags to help sellers and buyers communicate effectively. * Choose from Brand new condition, Mint condition, Excellent condition, Very Good condition, Good condition, Fair condition, or For Parts.
* For this particular listing & example we will use > Mint condition.
10. Short Description : No longer than a paragraph your short descrition is the first thing a buyer will look at, so make it punchy & to the point.
11. Description : Some gear need a longer description, please enter any additional important info here. This the perfect spot to enter your products Weight & Dimensions.
12. Inventory : For a single product click > Allow only one quantity of this product to be bought in a single order. Where SKU’s are necessary click > Enable product stock management to identify your product codes.
13. Other Options : If you wish add a Purchase note that the Buyer will receive via email following their purchase order. We also suggest that you Click > Enable product reviews : This feature is crucial for fostering trust and credibility within a multi-vendor marketplace, as it provides a valuable feedback loop between customers and vendors. By enabling product reviews, vendors can directly manage reviews on their store, improving customer satisfaction and fostering stronger relationships.
14. Finally click > Save Product button at the bottom right of the page.
* CONGRATS your Product has successfully been saved & Pending Review. As soon as GEARhub has verified your listing it will go live & online for the world to see. If you would like to share your GEARhub listing on Social media platforms then ( when it’s Live), simply copy & paste your products page URL to direct people to your Listing, easy peasy.
* If you have not as yet been approved as a TRADER please get a copy of your I.D ready & send it to info@allbang.co.za